This post may contain Affiliate Links please see my disclosure policy
Who doesn’t love a little Christmas Crafting? This Real Mini Christmas tree is easy to make and so much fun! With minimal materials you can make this beautiful magical Christmas Tree, which not only looks impressive, but smells divine too!

Why I love this Real Mini Christmas Tree Project
Affiliate links
- Minimal Materials– Most of which, you may already have at home. A Pot, Florist Foam, some branches and Christmas decorations
- Inexpensive– You could probably get away with spending next to nothing, floral foam is pretty cheap this time of year. You likely have an old pot lying about somewhere too ( I do Recommend Coir Pots though, they are beautifully rustic and smell wonderful, combined with the scent of the Christmas tree branches) You could even pinch Branches from the back of your Real Christmas tree, if you have one, If not, forage for some! Dig out some old lights and decorations to finish the look.
- Adaptable– Your Tree doesn’t have to look like mine, decorate to coordinate with your Christmas theme
- Natural– The real Foliage and Coir Pots (Coir pots are 100% Natural made from Coir Fibres, a wonderful eco-friendly alternative to plastic pots)

- Involve the Family– A fabulous project to do with the Kiddies, clip the branches to size then let them do the building and decorating!
- Easy– Not technically difficult at all, a lovely slow burn Christmassy project for a festive Sunday afternoon.
- Impressive!– Looks way harder than it is, your guests will be blown away, you could even make one as a gift?
- Beautiful– Look at it though!
How to make a Real Mini Christmas Tree
Affiliate Links
Materials
- 1 Pair of Pruners
- Florist wire
- 1 Foam Oasis Brick
- 1 Small Cylinder Oasis Foam
- 1 Empty 4 pint Milk Carton
- 1 x 13cm Coir Pot
- Nordmann Fir Branches-Top Tip* If you have a real Christmas Tree, prune some branches from the back of the tree where they wont be missed.
- Skimmia Sprigs – These were from my garden, but you could Forage for some Skimmia or Holly and Berries as an alternative.
- 1 set of battery operated Fairy Lights
- Mushroom Decorations
- Pine Cones
- Stones/Dried beans
Instructions (‘How to’ card and Video at the end of the post)
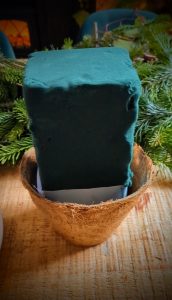
- First weigh down your Coir Pot with a handful of Stones or Dried Beans
- Cut the bottom Half off a 4 Pint milk carton
- Place the Carton in the Coir Pot
- Soak the brick and Cylinder Foam in Water for 5 minutes
- Place the brick upright in the milk carton
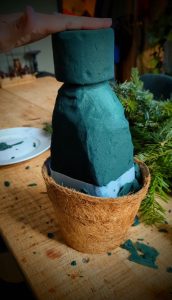
- With a Sharp knife begin Carving a rounded Oval/ tree shape
- Push 4 Toothpicks into the Cylinder Foam and attach to the top of the carved foam (see video on the ‘How to’ card below)
- Use a knife to round off the edges of the Cylinder Foam
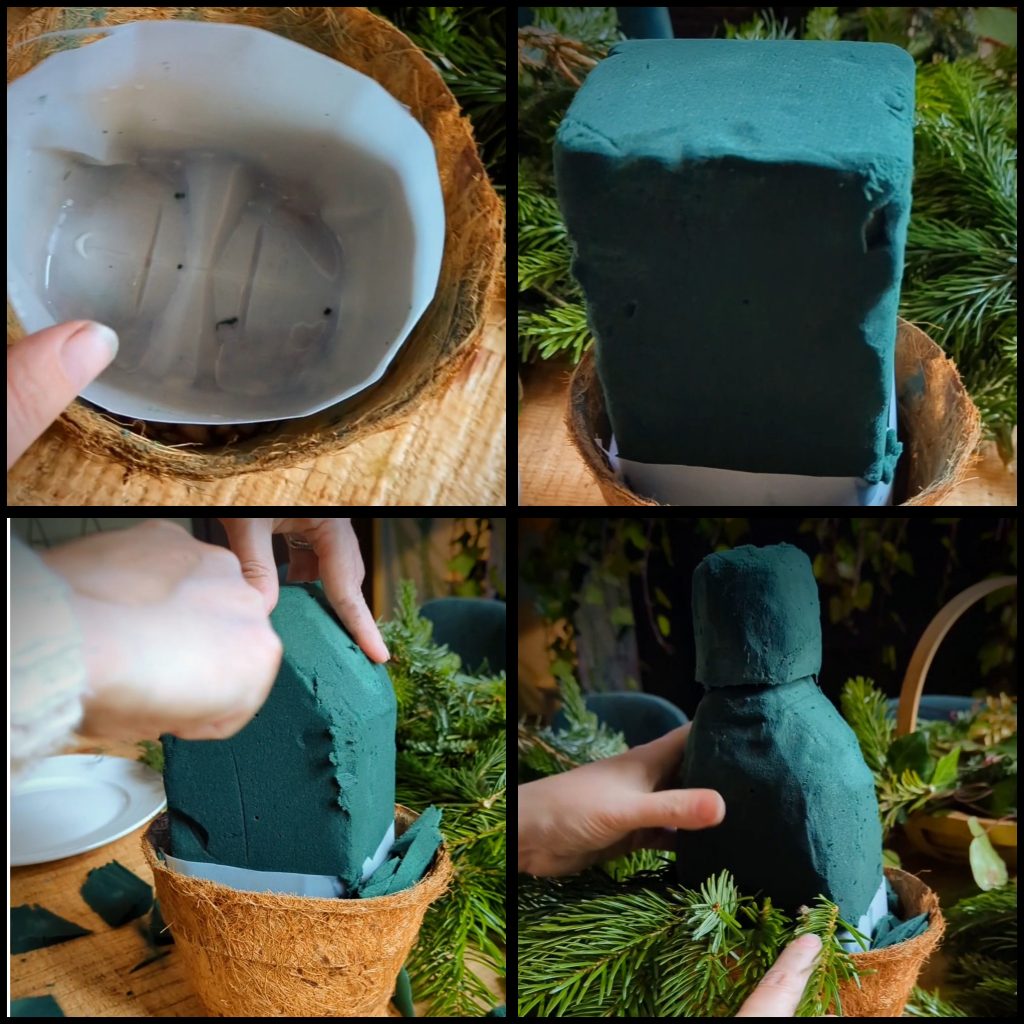
- Push the longest branches into the bottom of the foam, continue all the way round.
- Repeat this process all the way to the trop, with the branches gradually getting shorter and shorter (see video)
- Top with some sprigs of Skimmia, use florist wire to attach.
- Drape with Fairy lights, then attach small mushroom and Pine cone decorations with florist wire
- Turn the lights on and enjoy!

Substitutions
Nordmann Fir– I find Nordmann fir Branches the most accessible and economical Christmas Tree branches to use in my Christmas Arrangements (You can buy a Large tree for as little as £10 from Home bargains) I then simply prune away all the branches for my wreaths , garlands and other Christmas Craft projects. However- If you would rather, you can Forage for Foliage, in December there is always a vast array of evergreen foliage to be found in woodland and on Public Land. See My DIY Table Top Foraged Christmas Tree Post
*Foraging Etiquette
There are some rules you should abide by if you intend to forage for food, or for foliage.
Only take what you need-Take no more than you plan to consume or use and try to forage over a wide area rather than picking from one patch. Make sure you’re foraging doesn’t disturb the habitats and environments of the local wildlife.
Leave No trace– Leaving no trace of your presence is a sign you have foraged responsibly. Do not trample or disturb roots and only take when there is an abundance of your chosen food or foliage. This allows the plants to replenish and renew.
Don’t Pick from Private land – If you intend to, be sure to get permission first.
Only Pick from Clean areas – Avoid Roadsides, Industrial areas & Top tip* Foraging from the base of a tree for example would not be wise, the likeliness of a dog previously cocking its leg there…is high! If you intend to consume what you have foraged, wash first.
Alternative Foliage
Hedge Cuttings- Most have a good stiff stem, they will hold firm in the florist foam
Holly branches- Wear Gloves

Like to Snack while you Craft? Me too!
Have a nosy at these festive bakes and really get in the Christmas mood!


Did you Make this Real Mini Christmas Tree? If so, please leave a rating and comment below, I would love to know what you thought. Did you take a picture? Great! Tag me on Instagram, I love to share your creations on my stories

How to make a Real mini Christmas Tree
Equipment
- 1 Pair of Pruners
- Florist wire
- 1 Foam Oasis Brick
- 1 Small Cylinder Oasis Foam
- 1 Empty 4 pint Milk Carton
- 1 Coir Pot
- Nordman Fir Branches
- Skimmia Sprigs
- 1 set of battery operated Fairy Lights
- Mushroom Decorations
- Stones/Dried beans
Instructions
- First weigh down your Coir Pot with a handful of Stones or Dried Beans
- Cut the bottom Half off a 4 Pint milk carton
- Place the Carton in the Coir Pot
- Soak the brick and Cylinder Foam in Water for 5 minutes
- Place the brick upright in the milk carton

- With a Sharp knife begin Carving a rounded Oval/ tree shape
- Push 4 Toothpicks into the Cylinder Foam and attach to the top of the carved foam (see video below)
- Use a knife to round off the edges of the Cylinder Foam
- Push the longest branches into the bottom of the foam, continue all the way round.
- Repeat this process all the way to the trop, with the branches gradually getting shorter and shorter (see video)
- Top with some sprigs of Skimmia, use florist wire to attach.
- Drape with Fairy lights, then attach small decorations with florist wire
- Turn the lights on and enjoy!